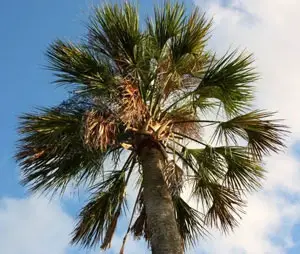
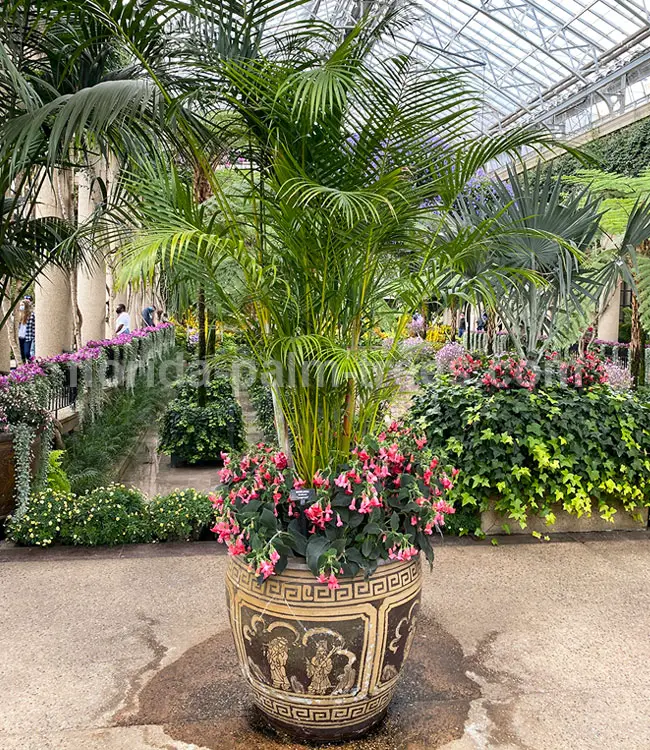
How To Care For Indoor Palm Trees And Not To Kill Them
Having palm trees as houseplants is a fantastic way to bring a little of the great outdoors inside. Not surprisingly, palms are my favorite type of houseplants. They add a very special tropical atmosphere to any space creating a sense of freshness and peace.
Speaking of freshness, palms actually cleanse the air and increase oxygen levels in the room. In addition, they reduce and absorb toxic gases and pollutants.
More importantly, indoor palms are loved and enjoyed by everybody. No matter how big or small your space is, there are palm species that will thrive in your environment.
All you need to do is choose the right type of palm, learn how to take care of it, and how not to kill it. While different palm species have different needs, some basic practices can be applied to all.
The right potting mix, amount of water, light exposure, container choice, humidity levels, and fertilization schedule will determine if your palm will flourish or struggle.
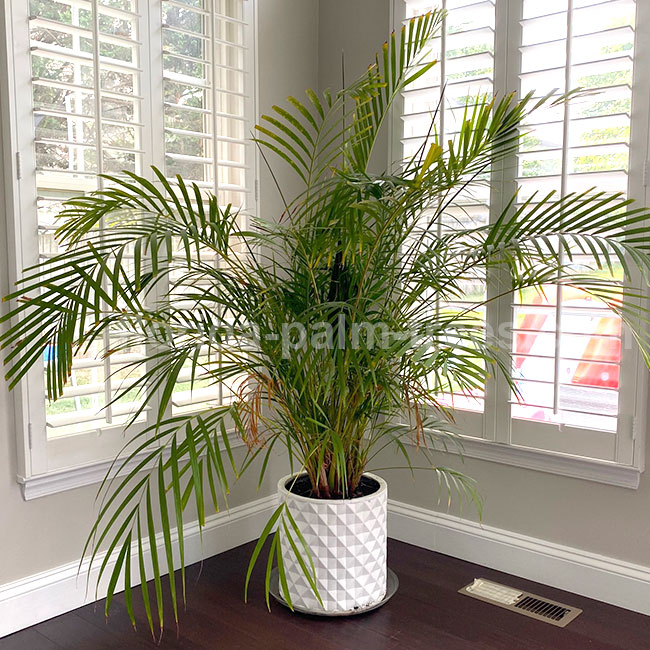
Choosing The Right Palm Tree As a Houseplant
This is probably the most important step. When you are palm shopping online or at a nursery, and that little green charmer catches your eye (aka #thebestplantever), take a moment and do a quick research before bringing it home.
Yes, it’s cute and small right now, but is it going to stay that way? How large can it get? How fast does it grow? Does it like bright light? Can it tolerate low light? Low humidity? Knowing these things will help you decide if this palm is right for you.
Not all palm trees do well indoors where humidity and light levels are much lower than outdoors and air circulation is very poor.
Of course, you can get a humidifier, maintain a constant warm temperature, and set up fans throughout the house to improve air circulation. In this case, you can grow many different types of palms, but you will be living in a big greenhouse.
And, do you really want to do that? That being said, don’t be a hero! Stick with palms that are known to do well indoors and take some neglect.
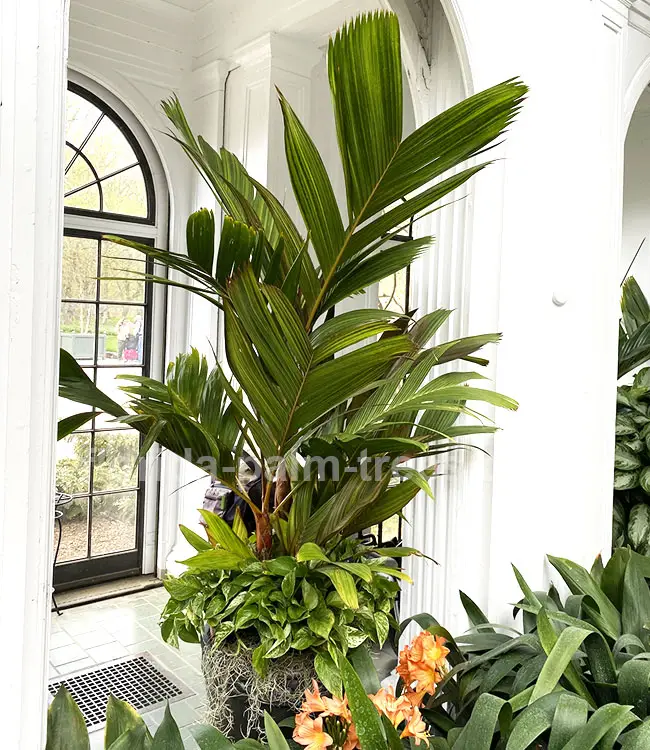
Most Popular Indoor Palm Trees
Many palm species have proved how adaptable they are to growing indoors. For a palm to do well as a houseplant, it must tolerate low light and dry air. Here is a list of the most popular indoor palm trees:
- Areca palm – Chrysalidocarpus lutescens
- Bamboo palm – Chamaedorea seifrizii
- Chinese Fan palm – Livistona chinensis
- Kentia palm – Howea forsteriana
- King palm – Archontophoenix alexandrae
- Majesty palm – Ravenea rivularis
- Lady palm – Rhapis excelsa
- Parlor palm – Chamaedorea elegans
- Ponytail palm – Beaucarnea recurvata
- Pygmy Date palm – Phoenix roebelenii
Light Requirements For Indoor Palms
Palms need light to survive and natural light is best. While some like bright light others can tolerate low lights. But, there are no palms that will live in a closet! In general, most palms will be happy in a bright room near the window with plenty of indirect sunlight.
Some palms like full sun and will enjoy having sun rays beating down on them the majority of the day. The south-facing window should be the sunniest spot in the house with bright direct light most of the day.
Keep in mind, that light and heat get amplified through the window panes and can cause a yellowing or even a sunburn of the leaves. If you notice whitish-yellow marks on your plant, it’s time to move it to a different spot with shorter periods of full sun.
For the most part, even if your palm likes full sun, it will do better in bright indirect light when younger.
Avoid placing your potted palm directly near the air vent. Dry hot air during cold winter months can dry your palm leaves causing them to yellow. I know, this could be challenging because most of the air vents are located right above/below the windows.
During warm months, you can move your palm outside. Since light levels outdoors are much higher, place the plant in a shade to avoid sunburn. You can move it into light shaded area after it has been used to higher light levels.
Use Of Artificial Light For Indoor Palms
If your home or office does not have a window with a bright exposure or a skylight, then you might have to get supplemental lighting. Surprisingly, many plants grow very well in the office environment under fluorescent lights with no windows.
The same can be done at home. Just get a few grow lights to keep your palms happy! Unlike incandescent lights, fluorescent and LED lights provide much of the light spectrum needed by plants and are relatively inexpensive to purchase and operate.
No matter what light system you choose, provide a minimum of 8 to 10 hours of supplemental light per day.
Why Air Circulation Is Important
Air circulation is another important factor. A good air movement tends to reduce problems with insects. While it’s hard to mimic the airflow of the outdoors, creating some sort of air movement can be done.
You can put your plant underneath a ceiling fan or near a small circulating fan. Opening windows during warm months is helpful. However, avoid cold drafts from the door, windows, or air conditioning during colder months.
How To Increase Humidity Indoors
During winter months when your heater is on, the humidity levels are often very low. Because most palms come from humid areas, providing extra humidity will be beneficial.
You can do that by placing the container on a platter with damp gravel. This will increase the moisture level around the plant without rotting its roots. Misting your plant with water several times a day or installing a room humidifier can also be helpful.
Moving your palm into a bathroom with a bright window where steamy showers add moisture to the air could also be a temporary solution.
You can move your palm outside during warm months so it can enjoy high humidity levels and get rejuvenated.
What Is The Ideal Soil Acidity For Palms
In general, palms can adapt to a wide range of pH levels and do well in either acidic or alkaline soils. They like loose soil that is light and drains well. The ideal pH level of 6.3 to 6.8 seems to work best for most types of palms.
To test the pH level, you can use a soil pH meter or a less expensive option like soil acidity test strips. You can always adjust the pH levels for your particular palm species.
Amending soil with dolomite limestone will increase pH levels while adding sulfur will decrease it. The more organic soil amendments you use, the higher the soil acidity will get.
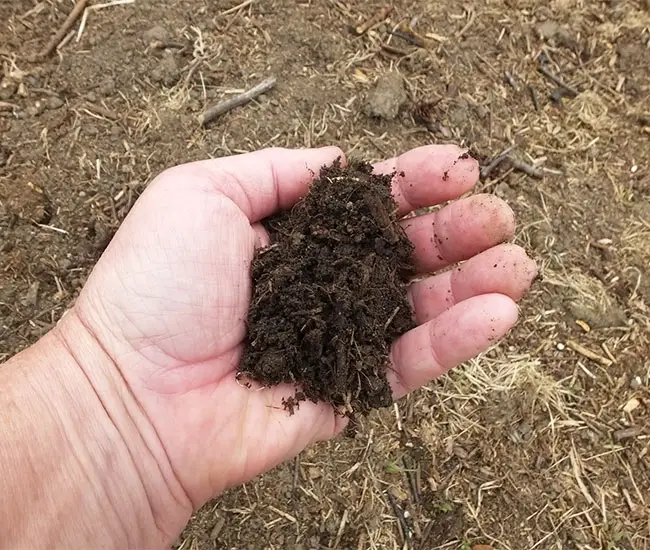
I know it’s tempting, but don’t use some random old soil from your outdoor garden for potting your palms. It may be not the right consistency for palms and also could contain pets or pathogens that you don’t want to bring indoors!
While there is no universal soil mix and your mix will greatly depend on the availability of components in your region, I want to give you some guidelines that you can follow to get it right.
My Ideal Soil Mix Recipe For Container Palms
An ideal potting mix should have good water retention, root support, and great drainage. This is pretty essential for palms to be happy!
After many years of experimenting with different types of soils for potted palms, I came up with the formula that I think works best for almost all types of palms.
- 30% perlite – is an amorphous volcanic glass that has a relatively high water content. It is used in soil to improve aeration and to retain water.
- 30% peat moss – is a dead fibrous material that forms when mosses and other living materials decompose in peat bogs. It helps the soil hold nutrients and holds several times its weight in moisture, releasing it to the plant’s roots as needed.
- 10% topsoil – use a high-quality topsoil from the store, not your garden. Unlike garden soil, it has been sterilized and does not contain unwanted weeds or pests.
- 10% coarse sand – improves drainage of the mix.
- 10% redwood shavings – improves soil structure, tilth, and drainage and increases nutrient-holding capacity. It also decomposes slower than shavings derived from softwoods.
- 10% pumice – is a stone that forms when lava and water mix together. While it’s a bit heavier than perlite, it also retains moisture and provides excellent aeration. If you can’t find it or it’s too expensive for you, use perlite instead.
Other Potting Soil Mixes
Many gardeners use just 50% peat moss and 50% perlite which is a very cheap soil mix that will work for seedlings but NOT going to do very well in the long run. That is why I recommend adding some topsoil and sand to it. Here is what you can use:
- 40% peat moss
- 40% perlite
- 10% coarse sand
- 10% high quality topsoil
If you don’t have time to mix your own potting soil and need to get a ready-to-use potting mix, I would recommend getting a well-draining potting soil with little organic matter, such as Miracle-Gro Cactus, Palm & Citrus Potting Mix.
How To Improve Drainage For Container Palms
When repotting, do NOT place your palm in a container without a drainage hole. All plants need drainage and will die without it!
Some pots come with drainage holes along with a built-in or attached drip pan around the bottom. Others may come with a nice matching ceramic saucer. In case it doesn’t have one, you can use an old plate or buy a clear plastic one.
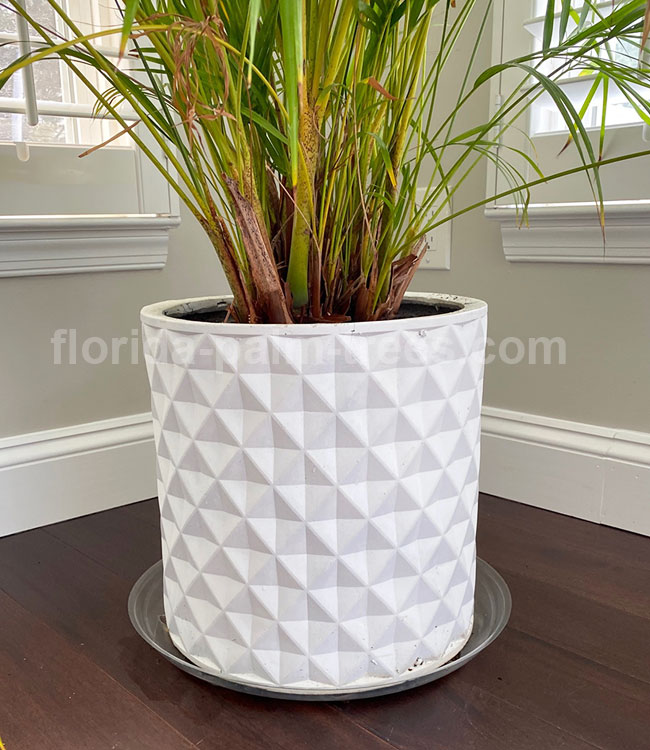
If you find an adorable container that you can’t live without but it lacks a drainage hole, you have a few options.
The first option is to use a slightly smaller container with drainage holes (usually the ugly one) and nest it inside the pretty new one. A few rocks at the bottom of the inner pot will create a space for excess water to drain.

The second one is to make a drainage hole in the pot. That is exactly what I did! In reality, it’s really hard to find a good-looking pot with a matching saucer.
So, after looking at popular stores like Lowes, Home Depot, and Ikea without any luck, I just bought some modern-looking pots and my husband drilled holes in them. Then, I got a bunch of clear plastic saucers from Amazon to match the pot sizes.
I was afraid that the plastic saucer would look tacky and cheap but it turned out to be perfect! Because the saucer is clear, you can barely see it.
How To Water Indoor Palms
Believe it or not, overwatering is the number one killer of all potted palms! Especially if this practice is combined with a lack of drainage holes in the pot.
When it comes to watering, more is not always better. The key is to maintain adequate soil moisture without over-watering the plant.
Indoor light, humidity levels, and temperatures all affect the rate at which the soil in the container dries out. While each home has a different situation, the indoor soil doesn’t dry out as fast as it does outdoors.
Even though your schedule may vary slightly from mine, I do suggest you get a regular watering routine down. Your palm friends will appreciate a regular watering schedule. Plus, developing a routine will help you remember when to water or not!
I water all of my potted houseplants once a week on Saturday morning when we clean the house. That’s a good time for me to mist the fronds of my plants while I am dusting the blinds.
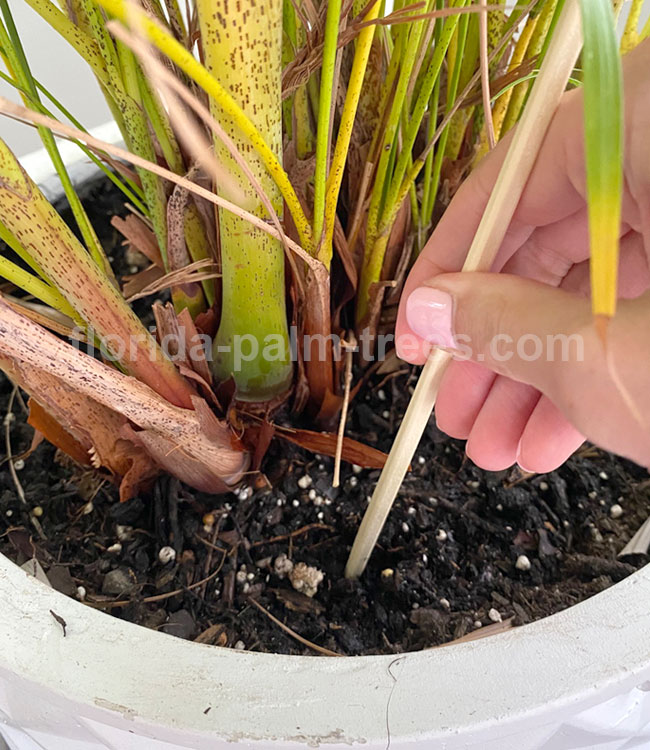
It is not uncommon for the top of the soil to pull away from the sides of the pot or to cake up. So, the water will run right off the surface, down the insides of the pot, and out the bottom drainage hole. While you might think you are overwatering, it actually bypasses the roots!
An easy solution is to lightly break up the soil and poke a few holes in it with a pencil or a chopstick. This will create small pockets for the water to absorb better and will increase aeration.
How Much Should I Water My Potted Palms
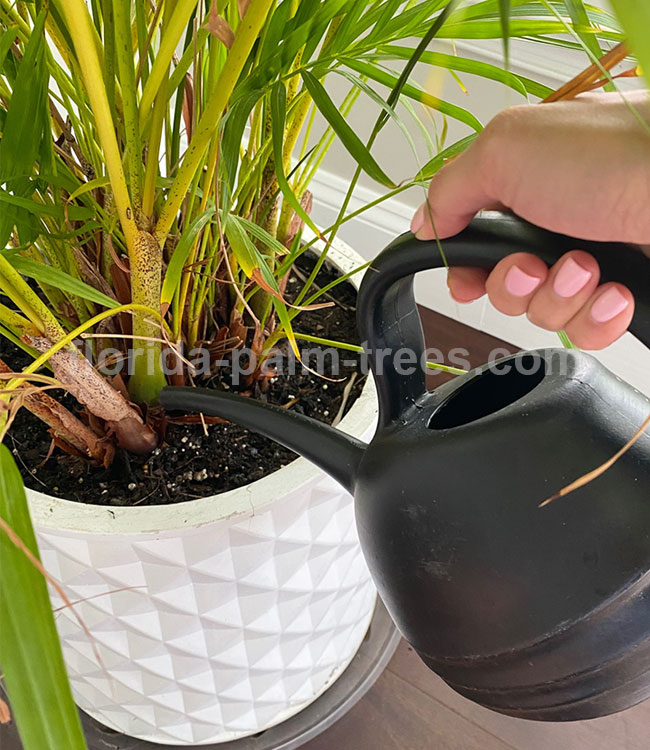
In general, palms need to be watered when the soil becomes nearly dry to the touch. Stick your finger an inch into the soil. If the soil is moist and cool, wait till it dries more.
When watering the plant, slowly distribute the water evenly covering the whole root zone. Continue to water till it seeps out of the draining holes into a saucer.
The amount of water for the container palm should be around 5% of the container for that palm. So, if you have a 10-gallon plant, use about .5 gallons of water.
I am saying ‘around’ because you should use common sense. It really depends on the type of soil, plant, container size, etc. Some of my palms get several cups each time. When in doubt, water less. Most of the indoor palms are drought tolerant and will be ok.
Now, I’ve seen some sites saying that you need 10 gallons of water for a 10-gallon palm!!! What?! Are they insane? That much water will certainly result in over-watering.
Signs Of Overwatering In Palm Trees
Speaking of over-watering, it can cause irreversible damage leading to root rot, and other diseases. In general, your palm will start looking unhealthy. Some signs of over-watering are:
- Wilted canopy with soft and limp leaves.
- Leaves turning brown with yellow circles.
- Droopy leaves that turn brown and drop before drying.
- Younger foliage and new growth turning brown.
- A foul smell coming from the root zone of the palm.
- White fungus-looking fuzz growing on the soil.
- Soggy clumping together soil.
To save an overwatered palm, you need to get rid of soggy infected soil, disinfect the pot, and re-pot your palm using a new potting mix. I would also spray it with copper fungicide spray just in case it has some fungi growing.
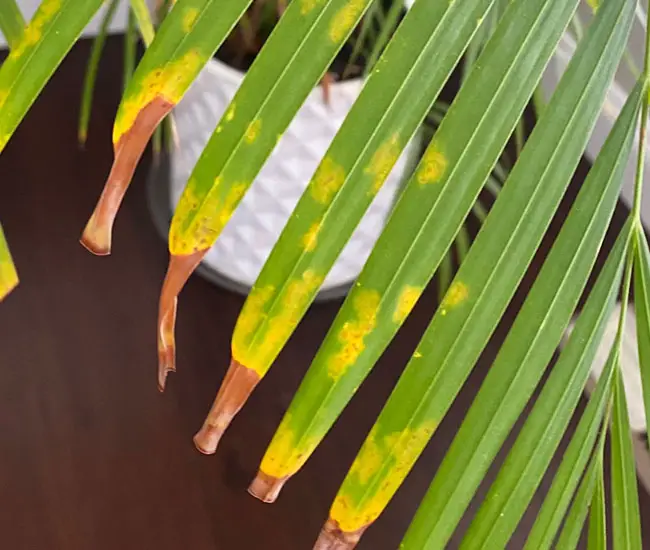
How To Avoid Salt Buildup In The Soil
Salt buildup is one of the big problems for potted palms. Most palm owners use city or well water which contains dissolved salt. After water evaporates from the soil it leaves salt behind.
Just like the inside of your teapot, salts from the water (sodium, calcium, magnesium and etc.) build up in the soil causing the plant to decline.
Salt levels can be measured with an inexpensive simple soil meter or soil pH strips. An ideal pH level for palm trees is between 6.3 to 6.8.
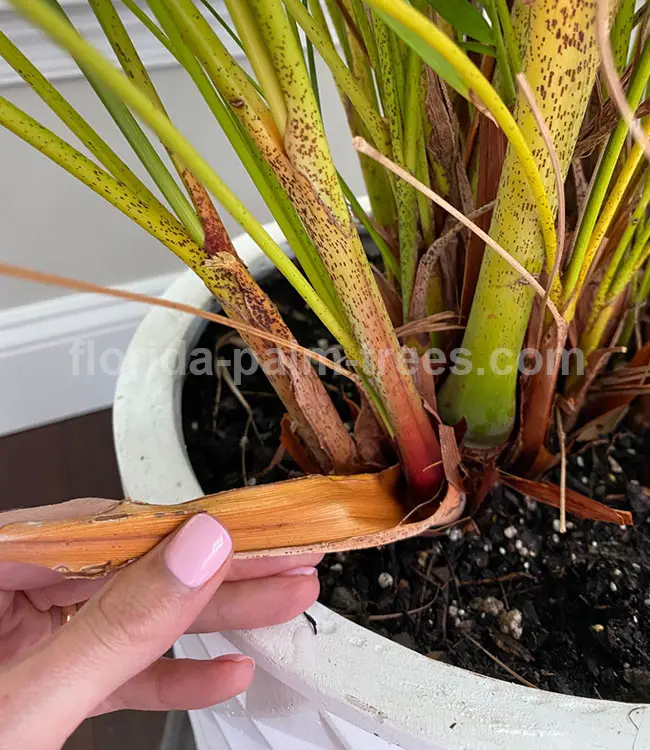
Signs of salt buildup are brown edges on the fronds and leaf tips. In more severe cases the bottom leaves will start to turn brown until only a few sick-looking leaves are left. If not corrected, it can lead to plant decline and eventual death.
To drain out unwanted salts, water the palm repeatedly with generous amounts of rainwater or distilled water. You can take it outdoors during warm days and water it about 10-15 times. If it’s too cold outside, do it in the shower in the bathroom.
This should get rid of all of the salt. After the plant drains all the water, bring it back inside. This type of leaching should be done a couple of times a year depending on the severity of the buildup.
You can slow down the salt build-up by watering your houseplant with distilled water or rainwater. However, fertilizers also cause salt buildup so you will have to leach your plant at least once a year anyway.
How And When To Feed Indoor Palms
Potted palms require a different feeding program than palms grown in the ground. Since indoor palms don’t experience cold winter temperatures, you can feed them all year long.
When buying fertilizer, you will see three numbers on the front or the back of the package like: 12-4-12 or 15-5-15 or 3-1-2. It’s the NPK (Nitrogen, Phosphate, and Potassium) ratio.
You want a fertilizer with the same amount of Nitrogen (N) and Potassium (K). Aside from the main NPK elements, a good quality fertilizer will have at least 6 other microelements like: Magnesium, Manganese, Sulphur, Boron, Copper, Iron, and Zinc.
I have to admit, I am not very good at feeding my houseplants. I have sooo many things going on, that they are lucky to get fed once a year! That is why I choose continuous-feed fertilizer that will provide my plant with nutrients for 6-9 months.
I use fertilizer spikes by Jobe’s. All you need to do is just stick them in the ground. That’s it! No measuring, no mess, and no smell. It’s a little more expensive, but a great timesaver for me.
If you have a lot of potted palms, a liquid or soluble fertilizer will be a less expensive but more time-consuming option. These are powders that you need to mix with water and then apply to your palms.
Consider also using organic matter like blood meal, bone meal, manure, fish emulsion, and worm castings. These organic options are slower-acting but have less chance of burn.
Container Palms Fertilizing Tips
- Always follow the directions and go on the dilute side. It’s better to give less than overfeed it. Remember, too little palm food will result in slow growth while too much can kill it!
- Never fertilize on dry soil because it can lead to plant burn and death. Always water your plant first.
- It’s best to fertilize your plant after you have leached it from the salt buildup and not before.
- Don’t get fertilizer on the crown of the plant to avoid injury to the leaves.
- If you are using granular fertilizers, don’t throw it all in one pile at the base. Scatter it evenly around the root area.
- Put the fertilizer away from the trunk of the tree to avoid burning the trunk.
- If you see a growth problem, salt test your soil with inexpensive soil strips.
How And When To Repot Palm Trees
A palm growing in a container will eventually need to be repotted. Over time, the potting mix gradually breaks down and the palm roots become restricted which leads to restricted foliar growth. If not repotted, the palm will decline.
Slow-growing and small species can remain in the same pot for two to four years. After that, you will need to repot it into the next larger size container.
If your palm has been in the same container for a long time and stopped growing, it probably means it needs a bigger pot. Poking through the bottom drainage hole roots is also a good indicator.
Another sign your plant needs to be repotted is when the water runs immediately through the soil and out the bottom. This could be a signal that the soil structure is poor or the root binding is going on.
Palm Tree Repotting Tips
- When removing the plant from the pot, lay the pot on its side and try to ease the root ball out without pulling on the stems. Loosen the soil along the inner walls of the container first to decrease root damage.
- Try to disturb roots as little as possible. Unlike broadleaf plants, palms don’t like root trimming. Many species lose all of their roots during repotting and have to regrow it completely.
- Try to keep as much of the old soil on the roots as possible. This will minimize the transplant shock.
- Even if you are planning on using the same pot, add some new soil.
- If you are re-using an old pot from another houseplant, wash it with soapy water and even some hydrogen peroxide. This will prevent the spread of pests and diseases.
- Place some rocks at the bottom of the pot to improve the drainage.
- A little piece of breathable weed fabric at the bottom will prevent soil from escaping through the hole.
- Plant the palm at the same depth it has been growing before. Avoid burying the stalk with the new soil or placing the football too high with no soil around it.
- Make sure to fill all the empty space around the sides of the plant when adding fresh soil. Don’t pack the soil in! Palms don’t like compacted soil since it doesn’t absorb or drain water that well.
- After planting the palm, water it thoroughly. See how the plant is settling in and if you got the depth right.
- Don’t fertilize for a few weeks to decrease transplant shock.
Pruning Container Palms
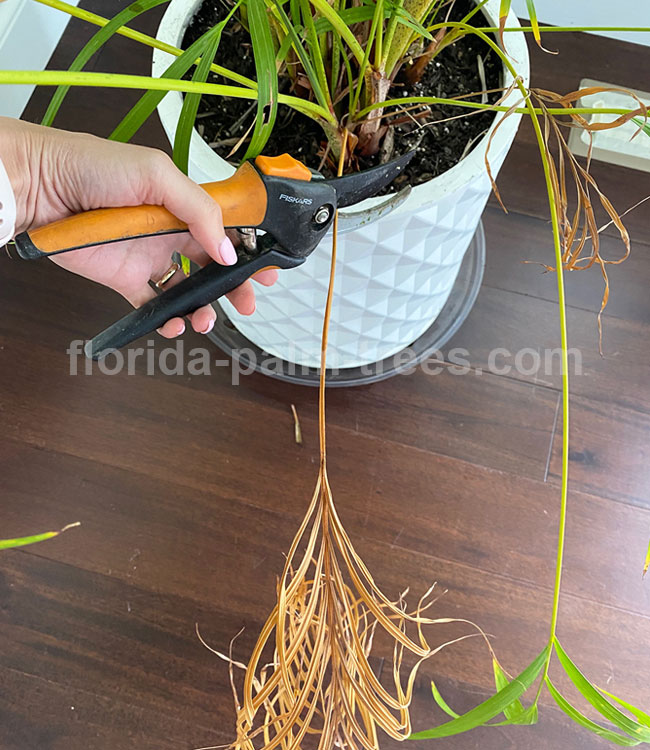
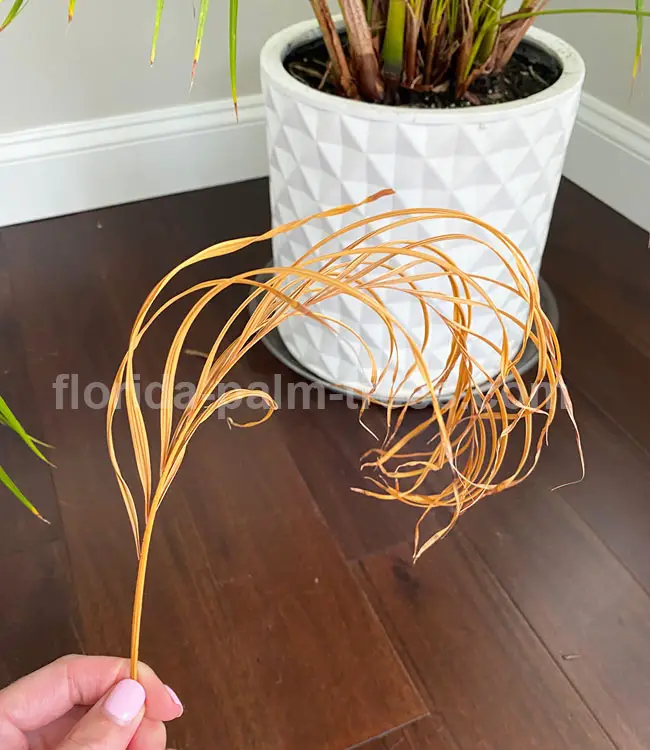
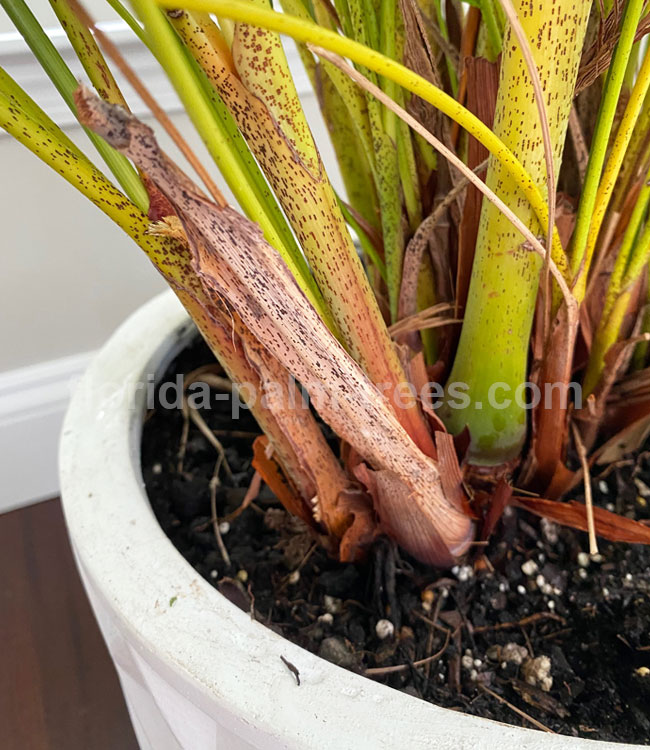
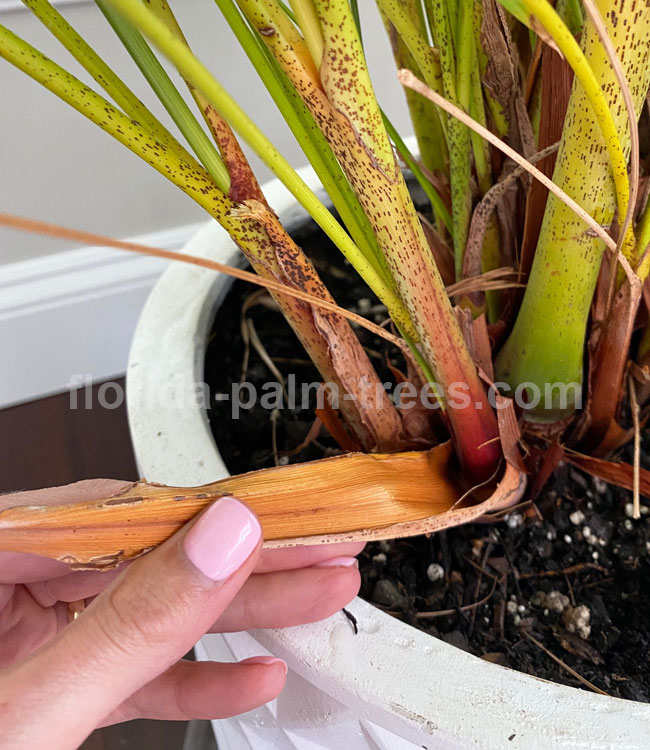
Usually, there is not a lot of pruning needed with container palms. Most growers only remove dry brown leaves to keep the plants looking clean. Typically, these are old bottom leaves that have died and need to be trimmed off.
You can easily prune them with handheld pruners. You can also trim the tips of the leaflets if they are brown.
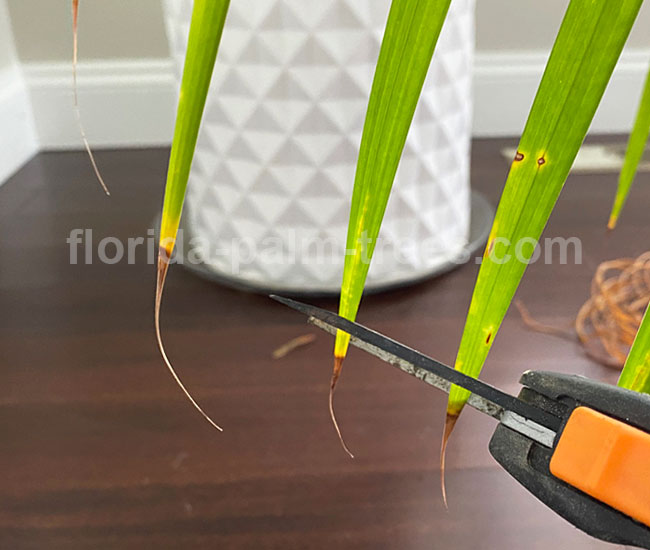
Avoid over-trimming as it will lead to loss of nutrients. As the old leaf dies and turns brown, the palm moves its nutrients to the newer fronds. Premature leaf removal will rob the palm of all this food.
Also, the removal of green fronds with green leaf bases will cause permanent scars on the trunk, increasing the chance of fungal or bacterial infections.
Don’t forget to clean the tools with rubbing alcohol to prevent the spread of various palm maladies. Since some palm stems are covered with sharp teeth, protect your hands by wearing gardening gloves.
Indoor Palm Tree Problems
Most problems with potted palms can be linked to inadequate light or incorrect watering. If you notice that the leaflets develop brown tips, that steadily become browner, the cause of the problem is in the roots.
Brown leaf tips are usually a result of underwatering, overwatering, excess fertilizer or low humidity. Sometimes it could be a combination of multiple factors. The key to helping your green friend recover is to determine the specific cause.
Once in a while, soil that is dry on top can be soggy in the bottom of the pot. Roots suffocate in excessively wet soil and die back. On the other hand, roots dry out and die when soil moisture is inadequate.
When the leaves appear washed out and pale, the cause might be too little light. Move the palm to a brighter spot. If that is not possible, provide artificial light.
Indoor Palm Tree Pests
I don’t want to cover ALL the different insects that may attack your precious houseplants in here. Thankfully, since they are growing inside, they are less likely to have pest issues than outdoor plans.
Fungus gnats ( tiny, short-lived flies) and fruit flies might make an occasional appearance if you have standing water or overly soggy soil. This is just one more reason to avoid overwatering your palms!
You can easily get rid of them by using natural and non-toxic products. Make a hydrogen peroxide solution by combining 1 part of 3% hydrogen peroxide to 4 parts of water. Soak the soil with this solution. It’s easy to make and is not dangerous for plants.
Aside from fungus gnats, spider mites are the most common indoor insect pests of palm. They like dry conditions with little air circulation. If you notice yellow stippling on the leaves, look more closely for moving dots or fine webbing underneath the leaf.
Because spider mites are so tiny, it’s hard to see them without using a lens. To get rid of them, wash the leaves with a damp rag or spray the leaves with water. Insecticidal soap is also effective against spider mites.
To prevent a reinfestation increase the humidity around your plant and give it an occasional shower to wash off the mites.
Mealybugs are another annoying scale insect. These small, soft-bodied pests hide on the underside of leaves or in the nooks between leaves and branches. If you see these guys, act quickly!
Rub your plant with a mix of soapy water and alcohol. Make a solution of 1 part alcohol to 1 part water with some dish soap mixed in, and wash down the entire palm. This should slow them down. To get rid of mealybugs completely, spray it with insecticidal soap.
Conclusion
And that, my friends, is the basics of indoor palm tree care. Maybe you knew a bit of this already, but I hope you learned a few new things too!
As you can see, caring for potted palms is not that hard. Most of the time you just need not to kill it with your love and care.
If you are a busy person like me who does not have much time to baby each plant, get palms that do great indoors and can take some neglect.
I often forget to leach my plants, so many of them get it no more than once a year. I don’t have time to water all my houseplants in the sink, bathtub, or shower, so I make sure all of them have drip trays and rocks at the bottom of the pot.
I forget to fertilize them on time, which is why I am using slow slow-release formula that feeds them for many months. And you know what? They are doing just fine!